
Take a light graffiti photograph in your garden

Blog entry
18th May
During isolation, why not get the family together and have a go at taking some light graffiti pictures in your garden? If this is something of interest or you would like to learn more about or may decide to read this blog to find out what light graffiti is!
Carry on reading as this blog will cover these set areas:
Tips & Tricks
Light graffiti photography artists
Light graffiti photography settings & phone apps to try.


Tips & Tricks
Use a tripod
Try both shutter priority & manual to see which set of settings works for you.
Experiment with different light sources
Shoot images at 100 iso to take care of the effects of noise
Use dimmable light sources so that you can change light intensity
Take multiple shots
Include Night Photography techniques - DOWNLOAD FILE to learn more.
Mix with ambient light - Ambient light means light that is already present in a scene before any additional lighting is added.
Light graffiti photography artists
Before I begin to explain the process of taking a light graffiti photograph, I wanted to introduce you to some amazing artists that take light graffiti images.
Dean Chamberlain
Website - https://lightpaintingphotography.com/light-painting-artist/featured-artist-2/dean-chamberlain/


David Lebe
Website - https://www.davidlebe.com/


Vicki DaSilva
Website - https://www.vickidasilva.com/


Light graffiti photography settings & phone apps to try.
Light graffiti – also known as light painting or light scribing – is essentially about combining time-lapse photography with light sources to imprint photographs with stunning, vibrant light.
How to take a light graffiti image
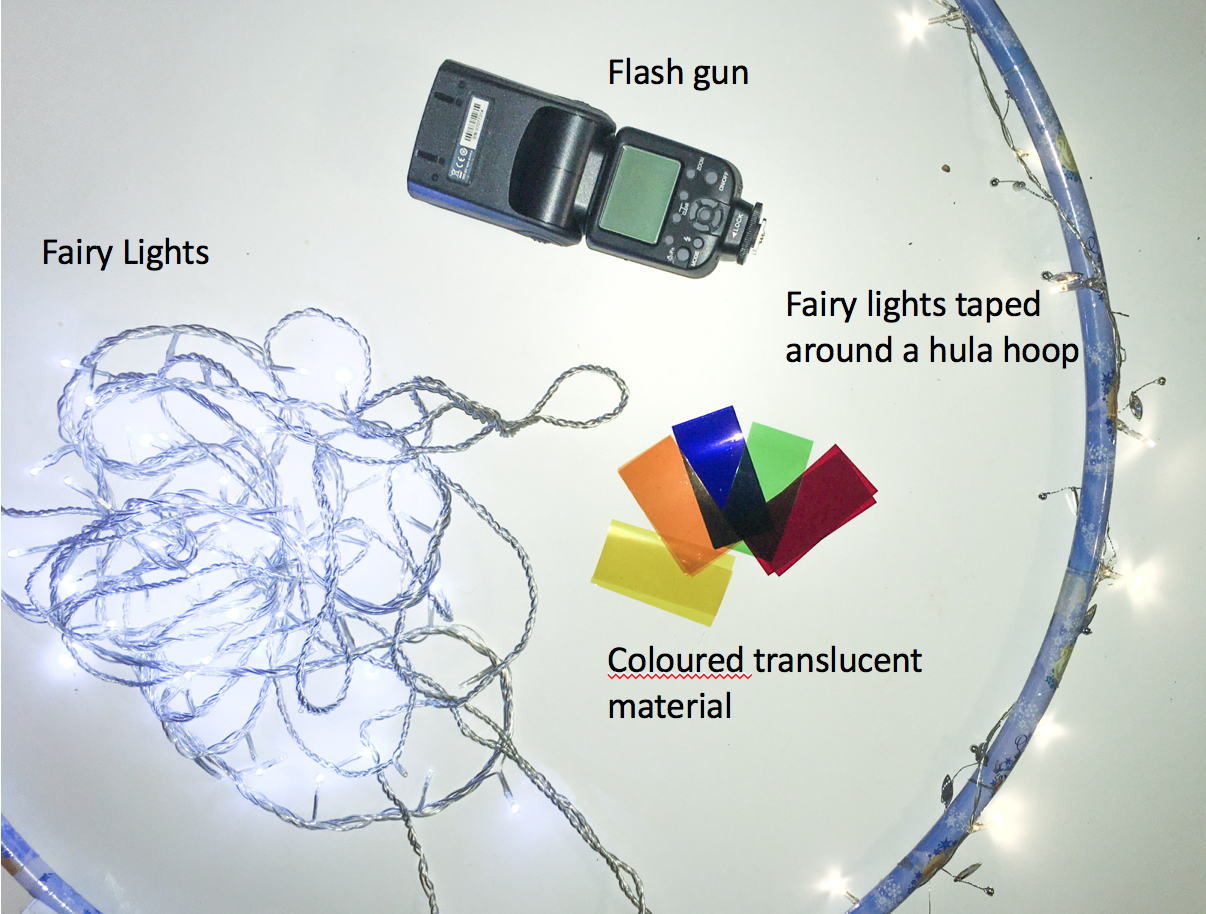
Here are the light sources I have used and experimented with.
The equipment you will require is:
Camera
Tripod
Remote or use self-timer
Torch
Light sources
Camera settings:
With your SLR or bridge camera, try these settings.
You need to always use ISO 100 and as you are using a variety of light sources, keep your white balance at either auto or flash. I would suggest putting your camera on a self-timer or using a remote to prevent shack as your speed will be slow.

Key settings:
Shutter Priority
Try using shutter priority but remember that this process will control the aperture as you change the speed.
Start your speed at either 10 and 30 seconds
Manual settings
Start your speed at either 10 or 30 seconds. You will need to change the speed to link to the light source that you are using.
Set the aperture at f11 and move it higher to control the darkness of the environment.
IMPORTANT - Focus is an issue during taking low light or nighttime photography.
To make sure that the camera can focus when using autofocus you will need to use a torch to light the subject, otherwise, the camera will have difficulty focusing. I recommend that you do this process and then turn the focus mode to manual. Once the focus has been set keep it on manual and always keep to the same place per picture, so that each image is continually in focus.
Shutter Priority
These images were taken when shooting with shutter priority.
In this set-up, the camera light meter will expose against the background and this is why you can see the garden.
You can see that the background is out of focus, this is because shutter priority, decides on the aperture and the wider the aperture the more light that is let in and this decreases the focus upon background. This is a nice idea if you want to either capture the blur from the person moving or the background.

The light source was the iPhone torch.

The light source was the iPhone torch.
Manual set-up
If you use manual settings you can amend the setting of either the speed or the aperture.
Rules to Remember:
Speed will make the light flow as you move it during the exposure time
f11 aperture & above will reduce the light and darken the background.
Here are photographs I have taken in the manual with four different light sources.


Using your phone
After reading the instructions given for using a camera, you may decide to use your phone or you may have just a phone to use.
I recommend that you experiment with all or some of the apps that can be used with either an iPhone or android.
Android apps
iPhone apps


Slow camera app
With this app, you can amend the speed, zoom-in speed and focus. It has three different capture modes to play with, which are automatic, manual & light trail.
If you use this app, use a tripod and if you use the capture mode for either manual or light trail you can set secs per exposure.
SUMMARY
In summary, you have a selection of tips and tricks to use when taking your own light graffiti images and camera settings to try. Please be aware that the settings suggested for the speed and aperture are starting points. Depending upon the light source, the aperture and speed will need changing for manual mode and the camera will amend the aperture for the shutter p mode each time you change the speed.
A quick reminder of settings:
Auto or flash white balance
100 iso
For both shutter p and manual - Start your speed at either 10 or 30 seconds
Manual - Set the aperture at f11 and move it higher to control the darkness of the environment.
Key things to remember:
Shoot at night.
Make sure that you get the focus correct.
Also please do not do this alone in a park or open spaces, always have a person with you.
Take a watch of the phone videos and try out the different light graffiti or slow shutter speed apps suggested as these will help you take some amazing colourful images.
Thank you for reading the blog
Contact me if you have any questions about the content of the blog.
In May I have decided to introduce a new series of ‘How to….’ blog subjects.
If you are interested then look out for these ‘How to…’ blogs, the next one is -
How to use depth of field in the home
I have published two from this series so have a read:
I am a full-time photographer and enjoy taking my own type of photography on a regular basis, so I can offer you commercial photography for your company or you can take a look through at my own fine art photography portfolio.
As part of my business, I teach photography, via adult learning and I am offering virtual sessions, see below.
1:1 PHOTO SESSIONS
I do offer a 1:1 photography session, so take a look at my 1:1 page for further details and book-in. I am selling gift cards, which would be an amazing gift for a friend or relative who is interested in learning more about photography.
Sign-up for the regular blog newsletter.
If you enjoyed this blog, then please sign up for my regular blog newsletter.
Any questions or comments please state below and follow my blog.